DIY Mural 101: How to Paint a Mural That Feels Like You - with Eloisa Henderson - Figueroa
A step-by-step creative guide with mural artist Eloisa Henderson-Figueroa — plus tips, tools, and a dose of bold colour joy.
There's something incredibly powerful about painting a mural in your home. It’s not just a decorative feature — it’s an artistic expression that speaks to who you are. Whether it’s a playful pop of colour, a calming geometric design, or a personal tribute to your favorite travel destination, murals have the power to transform any space into something uniquely yours.
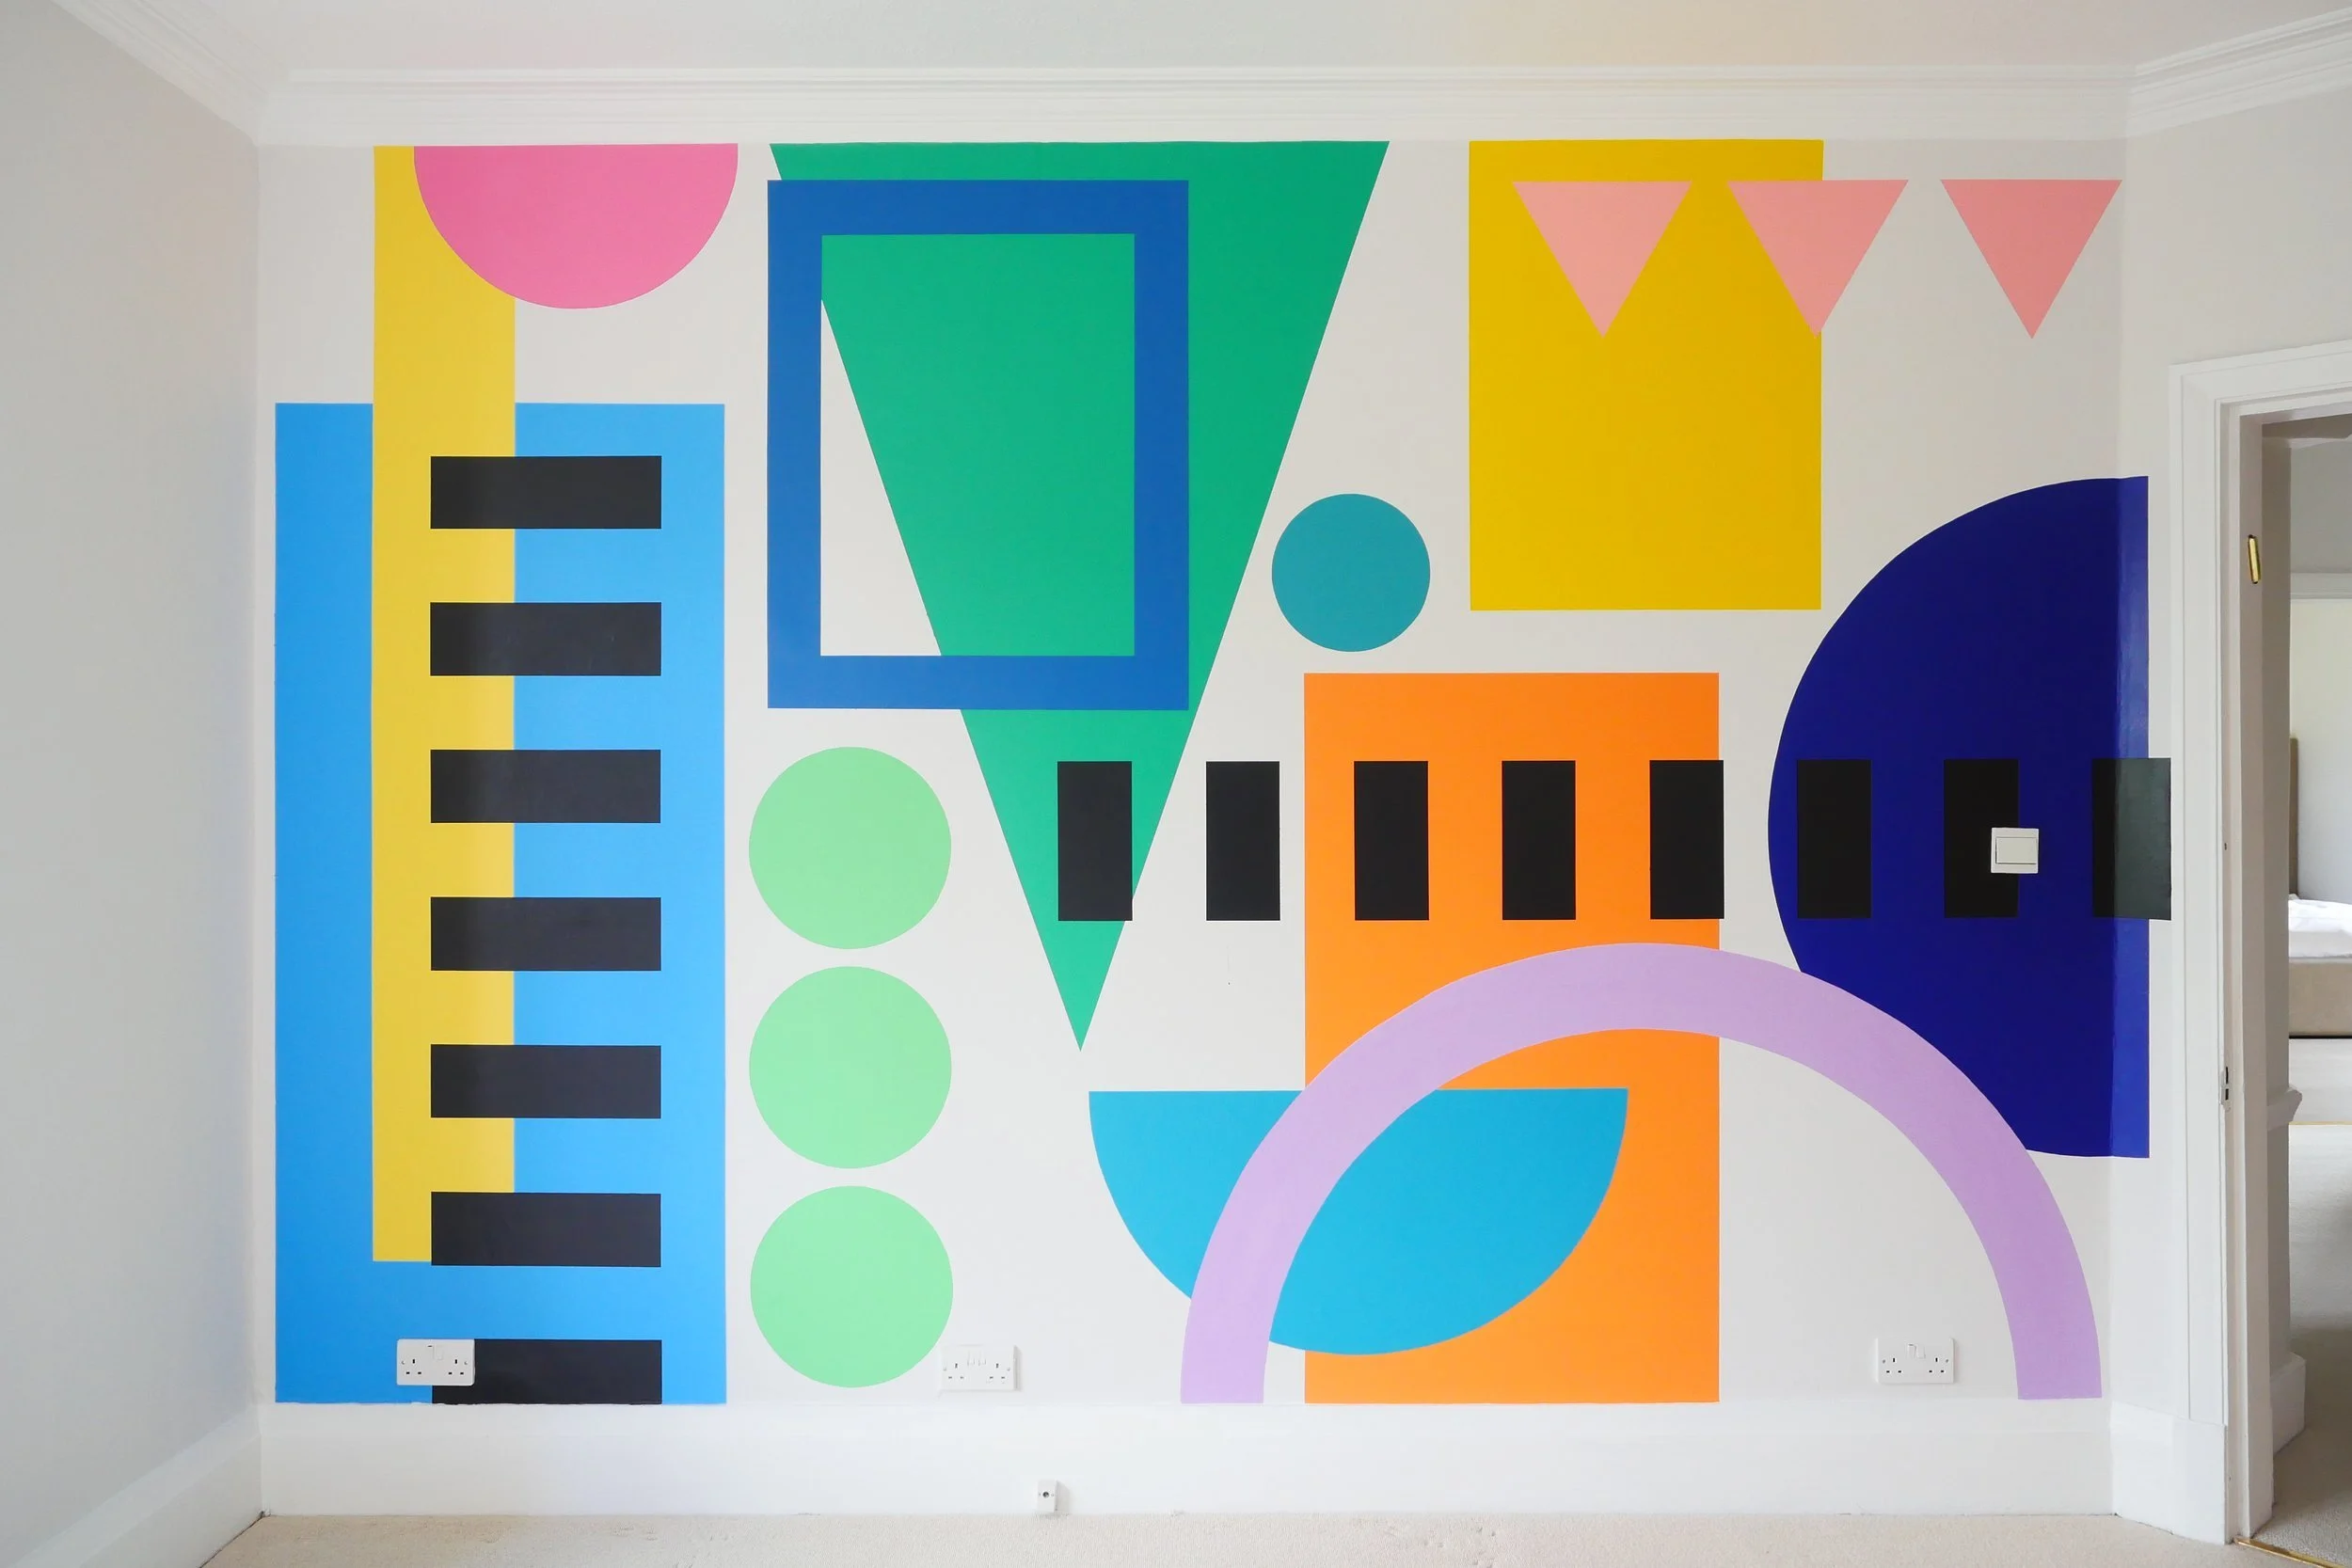
Private Home Project (North London) by Eloisa Henderson-Figueroa
But how do you start? How do you take that blank wall and turn it into a piece of art that feels completely you?
Well, grab your paintbrushes, because we’re diving into DIY Mural 101, with a special step-by-step interview with the brillant Eloisa Henderson-Figueroa, mural artist and all-around colour magician, to help you paint a mural that reflects your personality and energy.
From choosing colours you actually like, to getting past creative blocks and making your own home feel like a storybook — Eloisa shares her personal journey and tons of hands-on advice to get your first mural off the ground.
👋 Meet the Artist: Eloisa Henderson-Figueroa

Eloisa is a London-based mural artist who transforms everyday walls into vibrant, joyful landscapes. Her work blends abstract forms, bold colours, and a sense of freedom — think collage meets mural, with a touch of magic. She’s painted everything from primary school playgrounds to private homes, and her murals always start with you — how you want to feel, live, and move through a space.
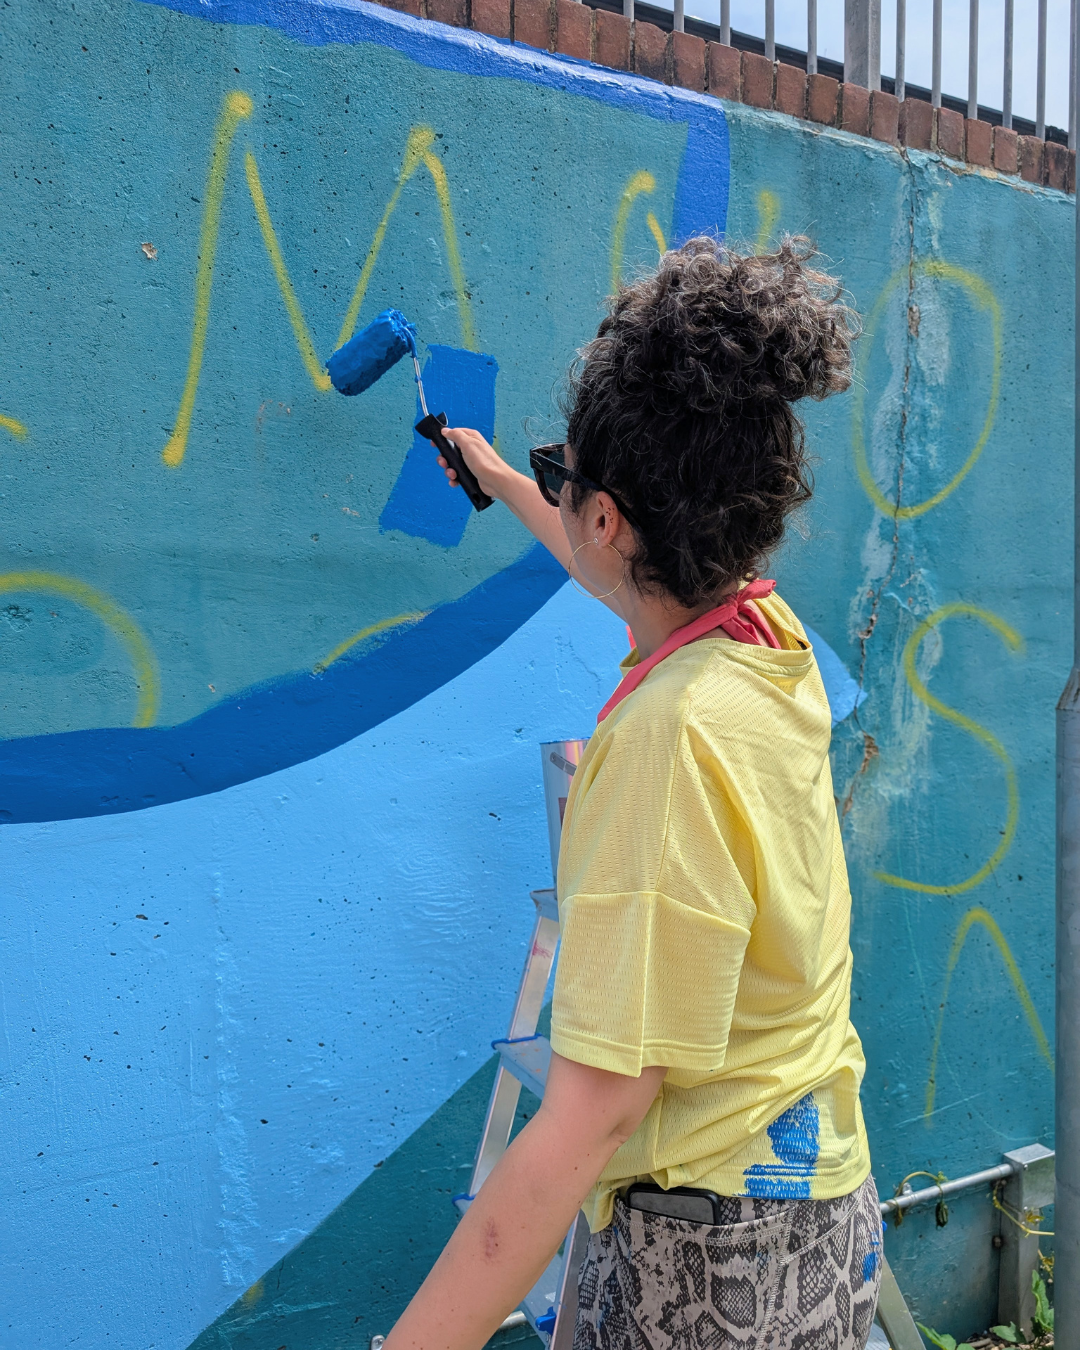
I had the pleasure of working with Eloisa on a recent community mural project (and lent a few brushstrokes myself!). In this Q&A, she’s sharing everything: from how she got started, to tools she swears by, to tips for your own DIY mural project.
Instagram: @eloisa.artist
Website: https://www.eloisahenderson.com/
How did you get started as a mural artist?
“It all started when my godmother asked me to paint the extension to her house. I’d never done anything like it before, but I’d been playing with collage and had started developing a style. She trusted me, so I just went for it — brushes, paint, tape, all of it. I loved it.
At the time I was working in film and TV as a prop painter, but during Covid, I finally had the space to focus on my own work. That’s when I really leaned into my style, and slowly, painting murals became my full-time job. I never set out to become a mural artist — it kind of found me.”
What impact do you hope your murals leave on those who see them?
“I just want to keep spreading joy and positivity throughout the world. I want to do that through my murals for people that get to see them every day, and I want to keep bringing joy on instagram through my work for people that don’t get to see them in person. People comment on how much they enjoy seeing my colourful murals come up in the Instagram feed and it brings a smile to their faces, and I absolutely love that even though they physically can’t see the murals in real life, they are still impacted by them and can still provide a moment of happiness.”
🧠 The Design Process: From Idea to Wall


What’s the first thing you do when starting a new mural project?
“It always depends on the client. Some people want full-colour, others want something more minimal. I’ve worked with a lot of schools, and I love running workshops with the kids to incorporate their ideas.
For the creative process, I always start with collaging — real paper, scissors, glue. That lets me explore shapes and ideas freely. Once I’ve got a sense of the design, I recreate it digitally using ProCreate, so I can test colours and even superimpose the mural onto a photo of the actual wall.”
Your murals are known for their vibrant colours and unique style. Could you share some of the techniques or methods you use to create those bold, impactful designs?
“I like to play with coloured papers and stickers! I collage with them, do quick exercises, create small artworks that then help me to find out what works together and what doesn’t. I have certain colours that I know work well together so I mainly stick to those, but I do try and push myself to incorporate colours I find hard to work with like certain greens and reds.”
Can you walk us through the step-by-step process?
“Sure! It usually goes like this:
Collage the design
Transfer it to iPad, adjust colours
Superimpose the design on the actual wall
Use either:
Doodle grid method (draw doodles on the wall to map shapes)
Masking tape grid
Or just rough grid lines to place shapes visually”
How do you choose colours for each mural?
“In general I have a set colour palette that I’ve developed over the years from doing different jobs. It’s easier to have specific colours you use because then I don’t have a million different tins of paint to choose from. Sometimes I need specific colours for different clients or maybe I feel like I need different shades of a colour to bring more harmony into a space.
In general, the colours I use work well in any setting. The bold and vibrant colours brighten up any room and space, so I never really have to think about the setting.”
🎨Making It Personal: Working With Clients

When you’re commissioned to paint a mural, how do you make sure that the final design reflects the client’s personality? How do you involve them in the creative process?
“I ask them what they want, if there are any examples of previous work I’ve done that they like, this then gives me an idea of what they’re looking for. They may ask you to use specific colours that reflect them, so I try and incorporate their colours with my own colours. When I show them the designs I generally do a couple of designs with different feels so that they can choose and it gives me a better idea of what they want.
When I work with schools, they love knowing that the kids have been a part of the mural design process and the kids love seeing it come to life. That really makes them feel involved and a part of it.”
Out of all the murals you’ve created, is there one that stands out as your favourite? Why was it so meaningful to you?
“I painted a school down in Richmond and ran workshops with the kids to develop their artwork into the design. I painted it while the kids were in school and they absolutely loved seeing it come to life and would be excited every break time to come and see what I’d done and what colours I was using. The amount of support and encouragement and kind words that the kids showered on me every day was lovely!
I was then told by the head teacher that one child had told her they were feeling sad, so they went to sit by my mural and it made them feel happy again. It was the best feedback I’ve ever had!”
I loved collaborating with you on the community mural project. What does it mean to you to create art in a community setting, and how do you think murals can impact the people around them?


“Murals can change how people feel in a space. They give joy and excitement to people and it can transform something from unloved, vandalised, underused and turn it into something that people treasure, care for and want to spend time in. The power of a mural can’t be underestimated. I’ve seen the impact it has on people, on communities and schools. They literally make people happy and can create positive changes in people and the community.”
🧰 Let’s give it a go!


Any tips for someone who’s never painted a mural before?
“Start simple. Paint one circle on a wall. That can change a whole space. Or block out a section of wall with a stripe or shape you love.
Use masking tape (yellow Frog Tape is my go-to!) to get sharp edges — especially if you’re not confident freehand. It makes a huge difference.
Choose colours that make you happy. I always include pink and yellow in my murals — they’re my favourites — so I know I’ll love the result.”
What are your must-have tools?
“I’d say:
Yellow Frog Tape – it’s pricey but gives super clean lines
A spirit level ruler – makes mapping out shapes quick and level
Different brushes – round for detail, large for big areas, rollers for smooth coverage
You really don’t need much more than that to get started.”
What if someone feels stuck or unsure where to begin?
“Go outside. Look at the shapes around you. Or visit an exhibition. Anything that gets you out of your head.
Then go home and collage it out. Play with coloured paper and stickers. Let it be messy. That’s how new ideas come.
Also, don’t overthink. I waited 3 years to paint my own studio wall! It’s easier to create for other people sometimes — so pretend you’re doing it for a friend, and just go for it!!”
🧡 Final words for anyone wanting to paint a mural at home?
“Don’t worry about it being “perfect.” Do what feels right for you. Paint something you’d love to see every day — that you’d be proud to say, “I made that.”
Start with simple colour blocking: a stripe, a half wall, a circle. Tape off simple geometric shapes — squares, arches, triangles — and paint them in bold shades. That alone can elevate a space.
And remember: it’s just paint. If you hate it, paint over it and try again.”
🎨 Quick Recap: Your DIY Mural Starter Kit
Before you start mixing paint, here’s what to keep in mind:
Start with what you love — a favourite colour, shape, or feeling
Masking tape is magic — clean lines make a big difference
Keep it simple — even one circle or colour block can transform a wall
Trust your instincts — it doesn’t have to be perfect to be powerful
It’s just paint — if you don’t love it, you can always paint over it
Remember: your wall, your rules. You’ve got this 💛
🏠 Ready to add colour, joy and personality to your space?
If Eloisa’s story has you itching to pick up a brush, don’t stop here!
My course, Colour Your Home Happy, is the perfect place to start — with fun exercises to help you trust your instincts, get inspired, and take that first bold step.
✨ Bonus: Eloisa is offering an exclusive discount inside the course!
It’s your space. Let’s make it feel like you.